Creating an Autostart .NET 6 Service on a Raspberry Pi
In this post we'll explore how to create a service for a Raspberry Pi such that we can have a .NET process starting when the Pi boots.
Overview
I've recently had a couple of .NET projects requiring autostarting on Pi boot. With zero idea how to do this (outside of Topshelf for Windows), it was time to learn. In this post we'll work through examples of running a .NET program at Raspberry Pi boot with systemctl.
The Short
Create a .service file which looks similar to:
[Unit]
Description=Example for .NET ConsoleApp with systemd

[Service]
ExecStart=/home/pi/.dotnet/dotnet Simple-Dotnet-Linux-Service.dll
WorkingDirectory=/home/pi/simpleDotnetService
User=pi
Group=pi

[Install]
WantedBy=multi-user.target
Where ExecStart points to the dotnet command and then your .dll.
Copy this .service file to /etc/systemd/system/ then run:
sudo systemctl enable <filename>.service #enables autostart
sudo systemctl start <filename>.service #runs now
sudo systemctl status <filename>.service #checks status
Your .dll will now be run on system boot. Enjoy! Or, to see a worked through example, keep reading on.
The Long
The .NET Program
We'll use a simple .NET console and since this is via a new .NET 6 console project using top level statements, it really is just 3 lines.
var path = Path.GetTempFileName();
File.WriteAllText(path, $"{DateTime.Now}");

Console.WriteLine($"Wrote temp file: {path} at {DateTime.Now}");
Big thanks to the post Writing a Linux daemon in C# for teaching me about the beginning work for this post and introducing me to the Path.GetTempFileName() call. And if you're interested:
This method creates a temporary file with a .TMP file extension. The temporary file is created within the user's temporary folder, which is the path returned by the GetTempPath method.
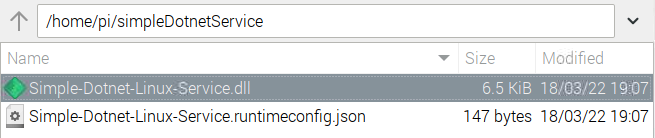
I called my project "Simple-Dotnet-Linux-Service" and after a build we're only interested in:
- Simple-Dotnet-Linux-Service.dll
- Simple-Dotnet-Linux-Service.runtimeconfig.json

Copy these over to your Raspberry Pi, I chose /home/pi/simpleDotnetService.
Side Note - Make Sure You Have .NET Installed
This won't run unless you have .NET installed - and you also need to know the location of it. I know for mine, the binary is located at /home/pi/.dotnet/dotnet based on this previous post of mine:
 Niko Uusitalo
systemctl
In really short: systemctl controls the service manager. That's an incredible understatement so feel free to read more:
We'll create a "unit" in a .service file which details what the service should do. For this example I created one called dotnet-service-run-once.service which looks like:
[Unit]
Description=Example for .NET ConsoleApp with systemd

[Service]
ExecStart=/home/pi/.dotnet/dotnet Simple-Dotnet-Linux-Service.dll
WorkingDirectory=/home/pi/simpleDotnetService
User=pi
Group=pi

[Install]
WantedBy=multi-user.target
Your configuration may differ in these places:
ExecStart: uses thedotnetcommand to run the.dllWorkingDirectory: where the.dllis
As a side note, security topics are out of scope for this ticket, but you may want to consider:
- Reading about
PrivateTempin a.servicefile - Using a specific user, rather than the default Pi
Copy this .service file to /etc/systemd/system/ which is where systemctl looks for services. For simplicity I used the cp command like so:
sudo cp /home/pi/simpleDotnetService/dotnet-service-run-once.service /etc/systemd/system/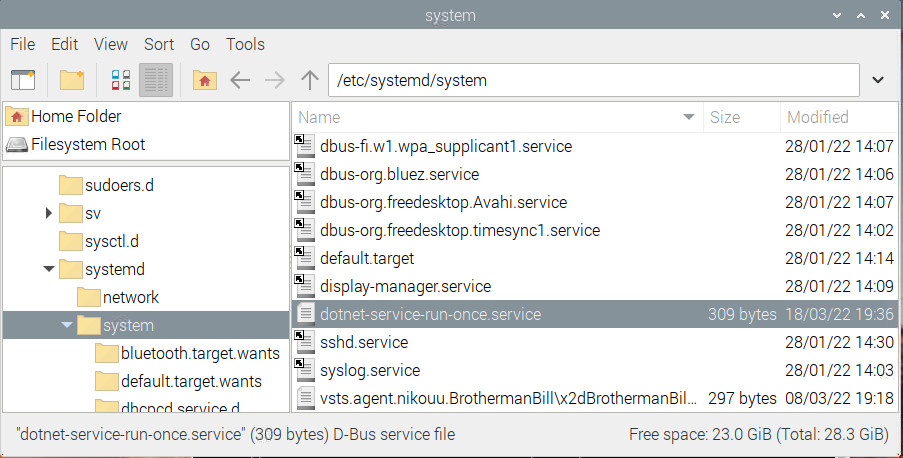
.service file in /etc/systemd/system/With everything setup, we're ready to the service commands:
sudo systemctl enable dotnet-service-run-once.service #enables autostart
sudo systemctl start dotnet-service-run-once.service #runs now
sudo systemctl status dotnet-service-run-once.service #checks status
And that's it. After running the enable command, the service is run just after booting has finished. We can run the start command if we want to run it on demand. Then status outputs the log from the service, including Console.WriteLine() output.
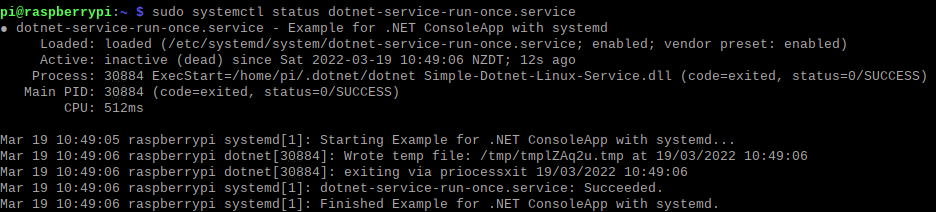
status command.Removing a Service
Following this great SuperUser answer I removed my service via:
sudo systemctl stop dotnet-service-run-once.service
sudo systemctl disable dotnet-service-run-once.service
sudo rm /etc/systemd/system/dotnet-service-run-once.service
sudo rm /usr/lib/systemd/system/dotnet-service-run-once.service
sudo systemctl daemon-reload
sudo systemctl reset-failed
To Conclude
We learned how to run a simple .NET program as a service on a Raspberry Pi by creating a .service file and running it with the systemctl command. I'll be using this to autostart my Discord bot, BrothermanBill, on Pi boot.