Installing Java 16 on a Raspberry Pi Zero 2 W
Installing Java 16 on a Raspberry Pi Zero 2 W is a bit of a pain and this tutorial will guide you through it.
Installing Java
As of writing this (2022), Java 16 isn't readily available via apt-get on a Pi Zero 2 W. We can check this by running apt-cache search jdk
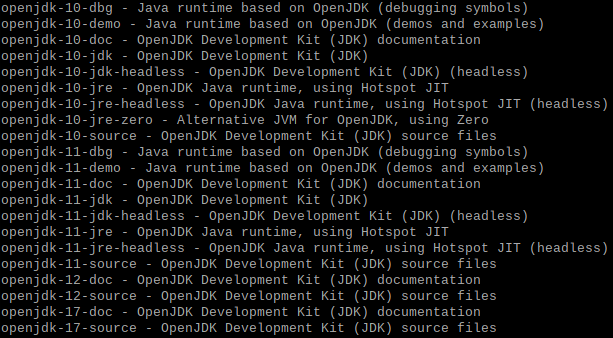
I'm not particularly good with any Unix based OS and seeing openjdk-17-doc and openjdk-17-source in the above screenshot didn't fill me with "Oh that's the JRE, I'll just install that". Just for fun I decided to try to install the source:

It didn't work. As expected.
Searching for a later Java version lead me to the split road that is OpenJDK and Oracle. I remembered that Oracle bought Java ages ago and there was a huge licencing issue in the community afterward. After reading about it for a bit, getting confused around licencing and JRE binaries for different *nix distributions I found AdoptOpenJDK (soon to be Adoptium).
The latest offered by AdoptOpenJDK is Java 16. There's an installation guide for many operating systems and I picked one for 64bit Linux as it also had instructions specifically for the Raspberry Pi OS at the bottom.
Installation Commands
For this exercise we'll be setting up apt with the AdoptOpenJDK package repository such that we can just use a sudo apt-get install call for our Java package. We could download and install the binaries ourselves, but I like the extra that apt gives us such as a common place for the repository binaries and being able to install/uninstall easily.
The following instructions are more annotated versions of the install guide.
-
Get the needed packages.
This installs the following commands:sudo apt-get install -y wget apt-transport-https gnupg-
-y: Automatic yes to prompts -
wget: Package for downloading files -
apt-transport-https: Package that allows us to get from HTTPS endpoints -
gnupg: Package for an implementation of OpenPGP for cryptography
-
-
Download the AdoptOpenJDK GPG key.
This downloads the filewget https://adoptopenjdk.jfrog.io/adoptopenjdk/api/gpg/key/publicartifactory.gpg.publicto our current directory. Here lies a regular PGP key that starts with the familiar
-----BEGIN PGP PUBLIC KEY BLOCK-----
We do this because we want to trust AdoptOpenJDK when usingapt. -
Make the key accessible by
aptgpg --no-default-keyring --keyring ./adoptopenjdk-keyring.gpg --import public
After reading the documentation, it perhaps creates a keyring from the gpg file. This step I'm a little fuzzy.gpg --no-default-keyring --keyring ./adoptopenjdk-keyring.gpg --export --output adoptopenjdk-archive-keyring.gpg -
Clean up the unneeded file.
rm adoptopenjdk-keyring.gpg -
Save the keyring in the root directory.
sudo mv adoptopenjdk-archive-keyring.gpg /usr/share/keyrings && sudo chown root:root /usr/share/keyrings/adoptopenjdk-archive-keyring.gpg -
Configure AdoptOpenJDK's apt repository.
Our key points in this long command:echo "deb [signed-by=/usr/share/keyrings/adoptopenjdk-archive-keyring.gpg] https://adoptopenjdk.jfrog.io/adoptopenjdk/deb bullseye main" | sudo tee /etc/apt/sources.list.d/adoptopenjdk.list-
We're essentially putting the whole string in the
echocall into a file that holds our package repositories:/etc/apt/sources.list.d/adoptopenjdk.list. -
The
teecommand pipes the data to both the file we're writing to and the console for us to see. -
The argument
bullseyecomes from getting the codename of the OS. Raspberry Pi OS is from Debian (which is also why the command starts withdeb) whose codename isbullseye. We can look this up ourselves by running:cat /etc/os-release | grep VERSION_CODENAME | cut -d = -f 2
-
We're essentially putting the whole string in the
-
Refresh our package indexes.
sudo apt-get update -
List the AdtopOpenJDK packages.
sudo apt-cache search adoptopenjdk -
Select the one to install. I opted for the Java 16 option.
sudo apt-get install adoptopenjdk-16-hotspot-jre
Or, if you want all 2:53 of me running through these:
With that, we can now run java --version and we should see that Java 16 is installed (you may need to open another terminal before trying this).

Woohoo! That's it. Enjoy all the fruits Java gives you on a tiny Zero 2 W!